
I’ve just completed my review of the Olympus PEN E-P2 Micro Four Thirds camera, a compact interchangeable lens camera and upscale version of the original PEN E-P1. Visit the Olympus PEN E-P2 photo gallery as well for full-sized photos.
DPInterface Olympus PEN E-P2 Review
by Brad Soo – March 12th, 2010
Not long after Olympus had their PEN E-P1 in stores, they decided to create a more upscale model to cater to those wanting additional features: introducing the PEN E-P2. At heart, the Olympus PEN E-P2 has the same core features found on the original PEN: including a 12 megapixel sensor, 3 inch LCD, full manual controls with automatic features available, ISO sensitivity up to 6400, 720p HD movie mode and same ‘retro’ design. Here’s what’s new on the Olympus PEN E-P2:
- New black/dark gray body design
- New accessory port for external electronic viewfinder and optional microphone
- New autofocus tracking for photo and movie modes
- New iEnhance mode for boosting brightness/saturation of most prominent color in your photo
- Two additional Art Filters: Diorama (miniature tilt-shift) and cross-process effects
- Playback control via HDTV models that support CEC
- Premium bundle: Every PEN E-P2 kit will come with a 1.44 million pixel electronic viewfinder standard
Olympus mentions that the PEN E-P2 will not replace, and instead will sell alongside the more affordable E-P1 model. So far that holds to be true as the original PEN still remains in many retail stores with no sign of phasing out yet.
Is the Olympus PEN E-P2 a camera worth the premium over its more affordable sibling? Find out now.
Size and Weight
(301.6) 128.8 x 97.5 x 75.3 mm (530 g) – Canon Digital Rebel T2i aka EOS 550D*
(311.0) 127.0 x 104.0 x 80.0 mm (560 g) – Nikon D5000*
(284.0) 130.0 x 94.0 x 60.0 mm (475 g) – Olympus E620
#(224.5) 120.5 x 70.0 x 35.0 mm (335 g) – Olympus E-P2*
#(228.3) 114.6 x 72.2 x 41.5 mm (296 g) – Olympus E-PL1*
#(252.8) 124.0 x 83.6 x 74.0 mm (558/593 g) – Panasonic Lumix G10/G2*
#(226.3) 119.0 x 71.0 x 36.3 mm (285 g) – Panasonic Lumix GF1*
(281.5) 122.5 x 91.5 x 67.5 mm (515 g) – Pentax K-x*
#(249.8) 123.0 x 87.0 x 39.8 mm (353 g) – Samsung NX10
(296.7) 128.0 x 97.0 x 71.7 mm (490 g) – Sony Alpha A380
*Features a movie mode (Video recording with sound)
# Small form-factor mirror-less interchangeable lens camera
All the weight figures above show when the camera is empty without any lens, battery or memory card
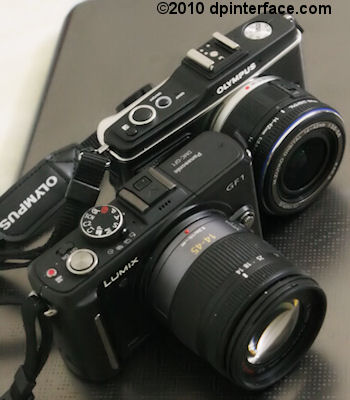
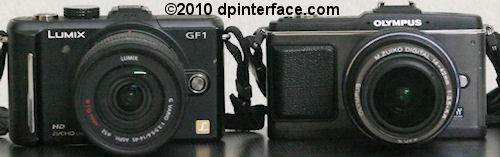
The Olympus E-P2 (along with the two other Micro Four Thirds Olympus E-PL1 and Panasonic GF1) is significantly smaller than the other digital SLR cameras in the market, including its own relative, the Olympus E620. The E-P2 is also quite a bit slimmer with no protrusions except the small rubber ‘grip’ on the front, so it can slip into larger pockets – yes pockets – or bags with ease (either body only or with the 17 mm pancake lens).
Box packaging
The Olympus PEN E-P2 comes with a pretty good bundle that includes the new electronic viewfinder accessory standard. Of course, this ‘luxury’ has probably been incorporated into the price difference you’re paying over the E-P1, but still good to know this viewfinder comes standard as it’s very useful. Open up the box and you’ll find the following included with the E-P2:
- External electronic viewfinder with case
- BLS-1 rechargeable lithium-ion battery
- Battery charger
- Body cap
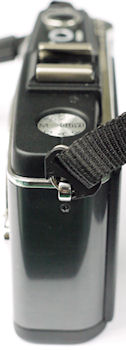
- Neck strap
- USB and video cables
- Camera software disc (Olympus Master)
- User’s manual
- Olympus M Zuiko Digital 14 – 42 mm f3.5 – f5.6 lens (with kit lens option)
- Olympus 17 mm f2.8 lens (with pancake lens option)
I think Olympus just made a point earlier this year when they announced all their new cameras for 2010 with support for the standard SD/SDHC memory cards only – putting their own proprietary and expensive xD-Picture card format to rest (finally!). The Olympus PEN E-P2 is one of those cameras (albeit announced in late 2009) which supports SD/SDHC memory cards – something that you may have lying around your house from your previous camera or other electronics. If you don’t, or are planning to get a new card, I would suggest getting a 4 GB SDHC to start, with at least a 60X speed rating since the camera can perform slightly faster with a high-speed card. If you plan on taking lots of photos and/or video, you have a good reason to get an even larger memory card – 16 GB cards aren’t as expensive as before nowadays.
550 shots – Canon Digital Rebel T2i aka 550D
200 shots – Canon Digital Rebel T2i aka 550D (LCD live view)
510 shots – Nikon D5000
210 shots – Nikon D5000 (LCD live view)*
500 shots – Olympus E620
200 shots – Olympus E620 (LCD live view)*
300 shots – Olympus E-P1/E-P2 (LCD live view)
290 shots – Olympus E-PL1 (LCD live view)
380 shots – Panasonic Lumix G10 (LCD live view)
360 shots – Panasonic Lumix G2 (LCD live view)
380 shots – Panasonic Lumix GF1 (LCD live view)
640 shots – Pentax K-x
400 shots – Samsung NX10 (LCD live view)
500 shots – Sony Alpha A380
230 shots – Sony Alpha A380 (LCD live view)
*In-house testing done by DPInterface. Our tests were conducted as close as possible to CIPA’s procedures
All the cameras above are rated with rechargeable batteries according to CIPA Standard; when using the viewfinder, unless noted otherwise
The Olympus PEN E-P2 uses the same BLS-1 lithium-ion rechargeable battery as Olympus’ other digital SLRs (the E-P1 included). Considering the E-P2 and E-P1 have so much in common, it isn’t odd that they both get the same battery life rating of 300 shots per charge (CIPA Standard) using the LCD. You can opt to use the bundled electronic viewfinder on the E-P2 to get slightly better battery life (I estimate the camera will last 5-10% longer) versus using the LCD.
Compared to its nearest competitors, the Panasonic Lumix GF1 and Samsung NX10, both can outdo the Olympus E-P2 by roughly 20%. Compared to ‘traditional’ digital SLR cameras in live view mode, the Olympus PEN E-P2 does quite a bit better, but naturally, the digital SLRs themselves do much better if you turn off live view and use their optical viewfinders instead.
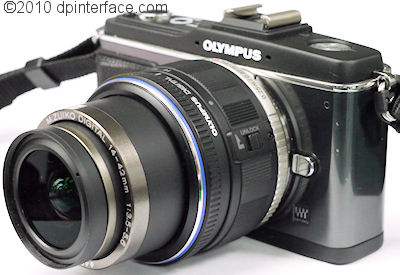
Retractable 14-42 mm kit lens
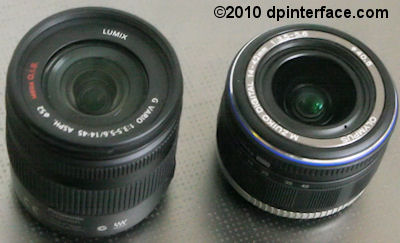
The Olympus PEN E-P2 uses the same special, retractable kit lens as the E-P1. This lens is a lot shorter than other digital SLR kit lenses (and zoom lenses in general, anyway) as you can ‘stow away’ the two-tier lens barrel when not in use via a “lock” switch. When it’s time to take pictures, just turn the zoom ring as usual until the entire lens construction extends outwards to more than double the lens’ default size. Portable? Yes. Practical? Yes, be sure to have the lens in the ‘extended’ position before you capture action shots though. Good image quality? Yes, and find out more later in the review when we talk about image quality.
Accessory port
The Olympus PEN E-P2 has a new accessory port directly under its hotshoe (above the LCD), which the brand new PEN E-PL1 also has. This new port allows you to attach special accessories to the camera; the ones that exist now being the external electronic viewfinder (bundled with the E-P2) and optional external microphone adapter that allows you to attach any 3.5 mm jack microphone to it. The accessory port opens up a door to a wide range of potential new accessories, but comes with a downside – you can only use one at a time and cannot attach an external flash to the camera (because it takes up the hotshoe mount).
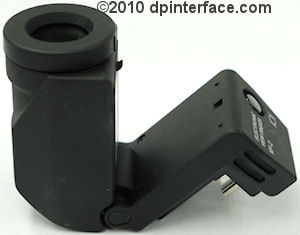
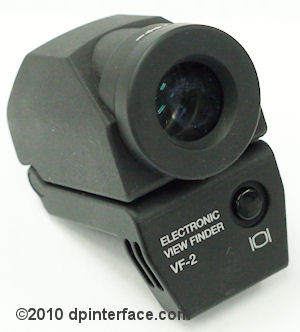
One of the new things that takes advantage of this new accessory port is the external electronic viewfinder that comes with the PEN E-P2 (you can also purchase it separately for the cheaper E-PL1 model). This viewfinder has a super high resolution of 1.44 million pixels and has 1.15X magnification. It’s large, bright and very nice; and you can also tilt it up to 90 degrees for low-angle “knee-level” shots.
Before we move on, I am going to answer a question I frequently get asked by many readers: you cannot use Olympus’ special port accessories on your Panasonic GF1 camera since they both use different port connectors and there’s also a height difference between the port and hotshoe so your accessories for one brand cannot ‘clear’ the port of the other.
Accessories
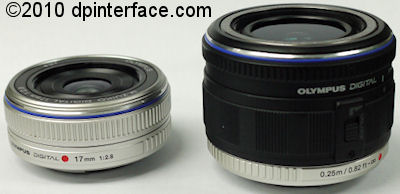
The choice of lenses you have in the Micro Four Thirds system has expanded quite a bit since the original PEN E-P1 was released. There are now various lenses ranging from ultra-wide zooms, standard zoom lenses, telephoto zoom lenses and pancake lenses, and oh, a macro lens made by Panasonic. One thing that’s still missing are normal prime lenses above the 30 mm range. The E-P2 is also able to take regular Four Thirds and Olympus OM lenses via their respective adapters (which cost around $175 each), though only some Four Thirds lenses will autofocus with the camera. All lenses mounted on the camera will be subjected to the sensor’s 2.0X focal length multiplication factor.
You can also add on external flash units to the camera, including third party ones, though only Olympus branded flashes will automatically sync with the camera. Olympus has a basic fixed position FL-14 flash, as well as FL-36R and FL-50R flash models, both of which support wireless flash functionality.
Remember that interesting faux-leather jacket available for the E-P1, that could protect the camera while preserving accessibility to all controls and the lens? Well, good news, you can use that same case on the new PEN E-P2. Olympus does not offer a battery/portrait grip option for the E-P1 – apparently it’s meant to be used like a rangefinder/street photography camera. There doesn’t seem to be any AC adapter option available for the camera either, though a wired remote control is available.
Camera Tour
The Olympus PEN E-P2 inherits the same body design as the E-P1, but this time, it’s been painted black/a dark tone of gray. So, you’ll get to handle the same metal body with excellent build quality and brilliant retro design from the previous camera. And let me tell you this – the ‘retro’ look works even more effectively on the E-P2 (probably because of the dark body color) and I had a few people ask me “how old is that camera?” and “you must have kept that camera in very good condition over the last two decades!”.
The PEN E-P2 has decent ergonomics despite lacking a ‘real’ grip – the raised patch of rubber on the front makes the camera sufficiently comfortable and stable to hold in one hand, and all the camera’s controls are located on the right, making single-handed operation even easier. For most part, the Olympus PEN E-P2’s controls are easy to operate save for the mode dial whose ‘outside dial’ is too recessed and the fairly awkward main command dial (upper right side) which is too narrow for large thumbs.

The Olympus PEN E-P2 has a Micro Four Thirds lens mount with a very familiar 12.3 effective megapixel LiveMOS sensor we’ve seen before in Olympus’ other cameras. As I’ve mentioned in the previous section, the PEN E-P2 works with any Micro Four Thirds system lens right out of the box, and also regular Four Thirds and Olympus OM lenses using adapters. With the Four Thirds sensor size, a 2X crop factor applies to any lens you attach to the camera (ie the 14 – 42 mm kit lens becomes equivalent to 28 – 84 mm in 35 mm terms).
Being the pioneer of built-in dust reduction systems of digital SLRs, Olympus has included their famed SuperSonic Wave Filter system which literally ‘shakes’ dust off the filter in front of the sensor so you won’t get any pesky dust spots appearing in your photos. The system worked well, better than that of other camera makers, during my time with the E-P2 as I didn’t find dust to be an issue, despite the frequency of me changing lenses (with the 17 mm pancake lens Olympus included and a few Panasonic MFT lenses I have).
Like the E-P1 before it, the PEN E-P2 features built-in sensor-shift image stabilization which works with any lens you attach to the camera (Panasonic Micro Four Thirds lenses included; but you’ll have to switch lens stabilization off when doing so). The sensor-shift image stabilization system allows you to work with shutter speeds down to 4 stops slower than normal handheld shots. The only downside of this system is you can’t use it in movie mode… There’s Olympus’ SuperSonic Wave Filter dust reduction system as well, which works very well by ‘shaking’ off the dust on the filter in front of the sensor.
Directly above the lens mount are the E-P1’s dual microphones, used for recording stereo sound in movie mode (the two small holes that flank the Olympus logo). To the right side of the camera is the lens release button and tiny self-timer lamp. Just in case you haven’t noticed, the Olympus PEN E-P2 lacks a built-in flash – something which the recently introduced PEN E-PL1 has (and also its competitors from Panasonic and Samsung). The PEN E-P2 also lacks an autofocus assist light like the camera before it.
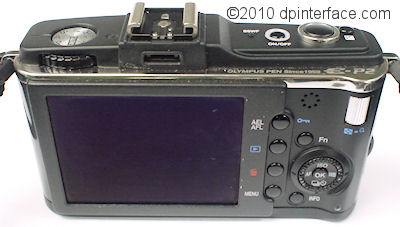
One thing that I complained about (along with many other reviewers) about the Olympus E-P1 was the low resolution LCD for a camera of its price. That hasn’t changed on the PEN E-P2 as it continues to use the same 3 inch LCD as before, with just 230,000 pixels. For an upscale camera like the E-P2, one would expect an LCD of higher resolution that even some compact cameras (and many mobile phones!) have nowadays.
One could argue that the super-high resolution (1.44 million pixels) electronic viewfinder bundled with the camera compensates for the low resolution LCD… but that’s no excuse and doesn’t make up for the LCD’s shortcoming completely. Plus, the electronic viewfinder adds bulk to the camera, which people may not want all the time. Back to the LCD, visibility was just decent under bright light (you may need to shade the LCD from sunlight outdoors) and very good in low-light. If you want to play it safe, I would suggest bringing that handy external EVF along in your pocket when shooting outdoors.
To the upper left of the LCD is the dial for controlling the recessed mode dial (!!). The dial itself is fairly stiff so there’s no way you can accidentally bump it. However, it doesn’t protrude enough from the camera, proving a challenge to turn if you’re in a hurry. Directly above the LCD is a small port - that’s the new accessory port I was talking about, used for making contact with the external viewfinder and microphone ad
Moving across to the right side of the camera and that’s where all the action is – wheels, buttons and all. On the upper right side (where your thumb would go), there’s a speaker and main command dial. The skinny command dial is used for adjusting settings, navigating menus and magnification (like manual focus zoom and playback zoom), but it can feel a bit narrow and awkward to some people.
Taking up the rest of the right side area are the navigation pad along with six evenly-spaced buttons. We’ll take a look first at the row of four buttons next to the LCD:
- Focus/exposure lock (customizable in the camera’s Custom Menu)/image protection
- Playback button
- Delete photo button
- MENU button
Next up, we have a customizable Function button along with an INFO button used to toggle the information/control panel type shown on the camera’s display. In the center of all the action is a five-direction navigation pad with a rotary wheel around it. The rotary wheel is used as a secondary dial to navigate menus and go through certain settings, and gives a nice tactile ‘click’ each time you turn it. The navigation pad is used for item selection, panning around images and provides direct access to four functions:
- Up – ISO sensitivity (Auto, 100 – 6400 in choice of 1/3 or 1 step increments)
- Down – Drive mode (One shot, continuous mode, self timer 2 or 12 seconds)
- Left – Autofocus mode (Single, continuous, manual focus, single with manual override, autofocus tracking)
- Right – White balance (Auto, daylight, cloudy, shade, tungsten, fluorescent [white, neutral or daylight], flash, custom, color temperature)
- Center – OK/Live Control panel
The Olympus PEN E-P2 features a new autofocus tracking mode which allows you to lock on to your subject and constantly track movement around the frame, so the camera will know where to focus when you press the shutter button. The difference between AF tracking and continuous focusing is that the camera will only focus when you half-press the shutter button in AF tracking mode, while in continuous AF mode, the camera will focus all the time, regardless of what you do.

The E-P2 also features advanced white balance controls – you can either set color temperature (from a range of 2,000 to 14,000 Kelvin) or adjust white balance up to +/-7 steps along the amber-blue and green-magenta axes respectively. White balance bracketing is also available for the latter.
Live Control menu
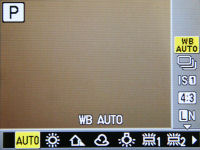
Like the original E-P1, the PEN E-P2 has what Olympus calls a Live Control menu, brought up by hitting the Center/OK button on the navigation pad. This menu contains a list of camera settings which you can change, much like the Function and Quick menus found on compact cameras… and there are a lot of settings that you can easily access that I’ve made this mini-section here dedicated to the Live Control menu:
- Scene mode (only visible in Scene mode)
- Art Filter choice (only visible in Art Filter mode)
- Movie record mode (only visible in movie mode)
- White balance
- Drive mode
- Image stabilization mode (Off, mode 1, mode 2, mode 3)
- Photo resolution, compression and aspect ratio
- Flash mode; only works if there’s a flash attached to the camera (Auto, redeye reduction, on, off, slow sync with redeye reduction, slow sync curtain 1, slow sync curtain 2)
- ISO sensitivity
- Metering mode (Multi, center-weighted, spot)
- Autofocus mode
- Face detection On/Off
- Focus area (All 11 points, selectable single point)
- Movie sound recording On/Off (only visible in movie mode)
The Olympus E-P2 has three sensor-shift image stabilization modes – Mode 1 is your usual ‘compensate for camera shake’ image stabilization while Mode 2 and Mode 3 are for horizontal and vertical panning respectively. I wish Olympus had put some sort of tooltip or indicator for each image stabilizer mode instead of vaguely calling them IS 1, IS 2 and IS 3 in the menu.
The PEN E-P2 also allows you to manually select one of 11 preset AF points, or all eleven points when it comes to autofocusing. One option that is noticeably missing is the ability to “move” the AF point anywhere around the frame and picking AF point size – a feature that the competing Panasonic GF1 has.
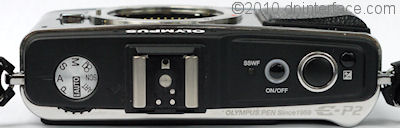
On to the top of the camera, the first thing you’ll see would be the Olympus E-P2’s mode dial:
- Movie mode
- Scene modes
- Art Filters – Pop art, soft focus, pale & light, light tone, pinhole, grainy film, diorama, cross-process
- Intelligent Auto mode – Just point-and-snap. There’s automatic scene mode selection incorporated into this mode and will pick one of five preset modes (portrait, landscape, night, sports or macro)
- Program mode – the camera will select both shutter speed and aperture; there’s Program Shift available so you can tweak the shutter/aperture combinations
- Aperture priority – pick an aperture value (depends on lens) and the camera will select a matching shutter speed
- Shutter priority – pick a shutter speed (between 1/4000 to 60 seconds in your choice of 1/3, 1/2 or 1 step increments) and the camera will select a matching aperture value
- Manual mode – you get full control over both shutter speed and aperture; bulb mode up to 30 minutes available
Directly above the lens mount is the external flash hotshoe. This versatile hotshoe will take either an external flash, the external EVF finder bundled with the E-P2 or the optional external microphone adapter that Olympus offers. You can use any flash with the PEN E-P2 but only Olympus ones will sync automatically with the camera. The Olympus PEN E-P2 can sync as fast as 1/180 sec with an external flash or up to 1/4000 using Super FP mode with an external flash.
Towards the right side, there’s the E-P2’s dust reduction status lamp (it usually flashes blue when you boot up the camera so you’ll know the camera is ‘shaking’ dust off the sensor) and three final buttons: the power button, shutter button and exposure compensation button (Exposure compensation up to +/- 3 EV in your choice of 1/3, 1/2 or 1 step increments).
Nothing to see on this side of the camera… let’s move on.
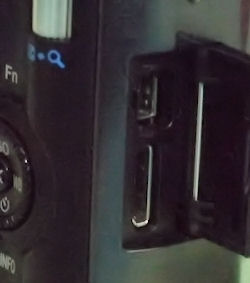
The E-P2 has two connectivity ports on its right side, kept out of sight by a plastic door – the top port is for USB, A/V Out and optional remote control while the bottom one is a mini HDMI port for connecting the camera to your high definition TV.
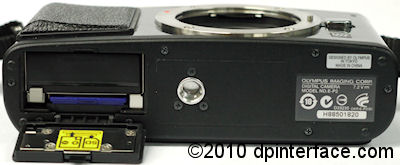
Over here, you’ll find the PEN E-P2’s metal tripod mount (which, oddly enough, isn’t in-line with the lens) and battery compartment. The compartment door is opened with a switch and has a sturdy feel to it when opened. Behind that door is a slot for the camera battery and SDHC slot.
Taking pictures (Shooting mode)
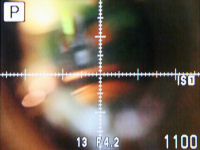

As you’d probably figure by now, the Olympus PEN E-P2 relies on live view only. Regardless whether you use the LCD or external finder, the camera is able to show 100% of the frame with shooting and exposure information, along with a real time image preview of your picture’s exposure, white balance, etc and even the different effects of Art Filters. You also have a choice of 3 framing gridlines, live histogram and manual focus enlargement (7X or 14X zoom).
There’s a gauge level indicator view available on the E-P1 as well. The gauge indicator acts like an ‘electronic bubble level’ and allows you to take level shots by simply adjusting the camera until the vertical and horizontal guides light up green.
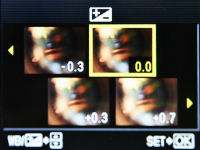
By pressing the camera’s INFO button, you can cycle through different on-screen display modes. One of those display modes is Perfect Shot Preview mode, which splits the screen into four parts to show you different effects of white balance and exposure settings. Besides making things convenient for seasoned photographers, Perfect Shot Preview is also useful for beginners learning to play around with different camera settings.
Multi Exposure
The Olympus E-P2 has a Multi Exposure feature (as seen on recent Olympus digital SLRs) which allows you to combine two pictures into one. An auto gain function you can activate and this evens out exposure of combined photos.
In shooting mode, you can combine up to two pictures – so after you take the first photo, the image appears on-screen as a semi-transparent overlay while you compose the second shot to be combined with the first one. Multi Exposure works in playback too, and allows you can combine up to four photos. The catch here is that images must be taken in RAW format to be combined in playback.
Shooting settings
The Olympus E-P2 has a whole lot of image resolution options; including 12 MP, 7.7 MP, 5 MP, 2 MP, 1.3 MP, 1 MP and VGA, along with numerous image compression: Superfine, Fine, Normal and Basic, and four aspect ratio settings (4:3 standard, 3:2 print, 16:9 widescreen or 6:6 square). You don’t see all these by default in the Live Control area; instead, you can dive into the camera’s custom menu to configure four preset combinations of image resolution and compression. The PEN E-P1 has a RAW mode as well, with file sizes at around 14 MB per shot.
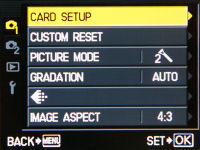
Unlike the simple grid menus on their compact cameras, the menus on Olympus digital SLRs are more comprehensive and are split into five main tabs. The first two of which on the Olympus E-P2 cover shooting functions:
- Card setup (Erase all, format)
- Reset settings
- Picture mode (iEnhance, vivid, natural, muted, portrait, monotone, custom)
- Gradation (Auto, normal, high key, low key)
- Image resolution and compression/Video resolution
- Aspect ratio (4:3 standard, 3:2 print, 16:9 widescreen or 6:6 square)
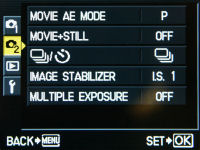
- Movie AE mode
- Movie + Still – autosave the last frame in a video clip as a still picture
- Drive mode – not sure why they have this same option in THREE different locations
- Image stabilization mode
- Multiple Exposure
Picture Modes
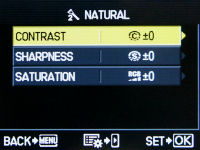
The Olympus E-P2 has six preset Picture Mode options (including one new option) and one custom option. The preset Picture Modes include Vivid, Natural, Portrait, Muted, Monotone and the new one called iEnhance (available in iAuto mode only). For all of the Picture Modes, presets and custom, you can adjust sharpness, contrast and saturation levels with 5 levels for each of them. For the Monotone option, the saturation option is replaced by filter and toning options. You can set which color to filter out (yellow, orange, red or green) and the tone of the final monochrome photo (Yellow, orange, red, green or sepia).
The new iEnhance mode detects the most prominent color in a photo and boosts contrast and saturation to further emphasize it.
There’s also gradation adjustment available (automatic, normal, high key or low key) which evens out exposure in photos by dividing a photo into small parts and optimizing contrast. High key prioritizes bright areas while low key prioritizes shadow/dark areas. The E-P2 has two color space options: sRGB and AdobeRGB.
Bracketing
The Olympus PEN E-P2 has four bracketing modes. The first two are pretty common in cameras which have manual controls: exposure bracketing takes three shots in a row in 1/3, 1/2 or 1 step intervals, as well as flash intensity bracketing, which does the same up to +/-3EV in terms of flash exposure compensation.
There’s ISO bracketing which takes three photos in a row, also in 1/3, 2/3 or 1 step increments, this time using different ISO values. Finally, there’s white balance bracketing if you’re using the white balance adjustment setting. White balance offers the ability to take three pictures up to +/- 2, 4 or 6 on each axis (amber-blue or green-magenta).
Custom Function menu
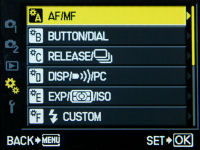
The Olympus PEN E-P2 includes many custom functions, which are organized into nine categories in its Custom Menu. Do note that the Custom Menu is hidden by default (not sure why, maybe so not to confuse beginners?); you’ll have to turn it on via the Setup Menu in order for the icon to appear.
- A. Autofocus/Manual focus section – Select Live View mode (covered in the sub-section above), select autofocus area, mode, focusing in bulb mode, lens reset and focus ring direction
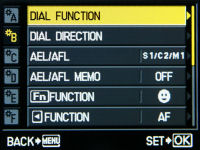
- B. Button/dial programming – Determine the camera’s actions/functions when you turn the top command dial, press the AE/AF lock button, Function button and left button on the navigation pad. You can also set 2 My Modes and button inactivity period
- C. Release priority – determine whether the camera takes a picture even if focus isn’t locked; with separate controls for single AF and continuous AF
- D. Display/PC – Set TV/PC connectivity settings, toggle live view boost & face detection, level gauge and amount of information shown in shooting/playback. There’s also slideshow setup and an option to toggle sound recording on/off in movie mode here
- E. Exposure/Metering/ISO – Set ISO and exposure step increments (1/2, 1/3 or 1 full stop), Auto ISO range, preset bulb mode period and mirror lockup delay (AKA anti-shock, as Olympus calls it). There’s also a bunch of stuff here to set up the E-P1’s four bracketing features and metering mode
- F. Flash settings – Set up flash sync speed, minimum shutter speed when using flash and flash exposure compensation
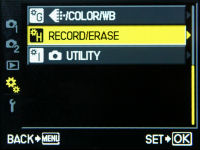
- G. Quality/Aspect/Color/White balance – Covers noise reduction, white balance settings, vignetting reduction and even customize the ‘preset’ image resolution and aspect ratios
- H. Record/Erase – Determine how the camera names picture files (default is Pxxxyyyy where x is the folder number, y is the image number), set photo DPI and a whole lot of settings covering ‘how photos are deleted’
- I. Utilities – Pixel mapping, exposure shift, battery warning and level meter adjustment
Most of the features in the Custom menu are self-explanatory. But there’s one feature worth covering from the AF/MF section – since Micro Four Thirds lenses use electronic manual focusing (The lens is electronically directed when you turn the focus ring; not direct control over a focus element), you can choose whichever turning direction you’d like to use with the camera. That’s quite a neat feature.
Not only can you control the focus ring direction, but the Olympus PEN E-P2 also offers a lot of customization in terms of its controls. You can set the action and direction of the command dial as well as three of the camera’s buttons.
The Olympus E-P2 features a mirror lock up function, which Olympus calls Anti Shock Release, and you can select the delay time from 1 to 30 seconds. I’ve explained pretty much everything of the next few sections in the Custom Menu until the Utilities section which holds two very interesting features. The Pixel Mapping feature allows you to map and remove hot pixels and dead pixels from the camera’s sensor.
The PEN E-P2 is somewhere between a digital SLR (in terms of controls and expandability) and a compact camera (things like movie mode and a few features); but Olympus decided to take the easy way out and just ported their SLR menu system over to the camera, and added and removed menu items as necessary. So Olympus SLR owners can just pick up the camera and begin using it. If you’re new to SLRs (or just Olympus cameras), you may have to pick that camera manual up and do some reading. But you don’t have to memorize everything, since most (yes, I said most, not all) of the items in the Custom Menu either ‘set once and leave it’ or some don’t need to be touched at all!
Setup menu
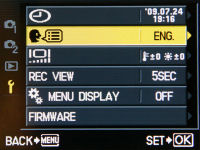
The final tab in the PEN E-P2’s menu system covers setup (I’ll talk about the Playback section later). There are only six items in the Setup area:
- Set date and time
- Set camera language
- LCD brightness and color
- Image review time
- Display Custom Menu
- Camera and lens firmware version
Art Filters
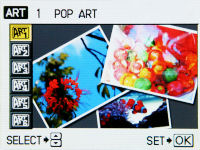
The Olympus PEN E-P2 has a total of 8 Art Filters (up from six on the E-P1) which allow you to apply a handful of preset effects without touching a computer:
- Pop Art – Increases color saturation and brightness
- Soft Focus – Lightens and softens photos
- Pale & Light – Flattens colors to give photos a dull look
- Light Tone – Increases brightness in dark areas to create even exposure throughout the picture
- Grainy Film – Increases contrast while turning photos black-and-white for that ‘classic’ look
- Pin Hole – Makes colors warmer looking while creating artificial, excessive vignetting in photos
- Diorama – Applies faux shallow depth of field to photos to make them look like miniature models
- Cross-process – Gives photos a weird color tint and saturation so they get this ‘retro’, semi-faded look
One note is that photos in Art Filters mode can only be shot in JPEG mode. If you shoot in RAW, the effects will not be automatically applied to photos… for some reason, however, you can apply Art Filters to RAW photos AFTER you take a shot and convert it into a JPEG picture (ie using the playback tool).
One thing about the Art Filters is that the live preview when using certain “resource heavy” ones like Pinhole or Diorama mode will cause your preview frame rate to become extremely choppy. You can also use Art Filters in movie mode, though frame rate will be significantly choppier and definitely lower than “30 FPS”.
Other scene modes and macro
The PEN E-P2 has a good selection of point-and-shoot scene modes which cover portrait, landscape, landscape with portrait, sports, night scene, night portrait, children, high key, low key, digital image stabilization (This merely boosts ISO as high as needed, and I’d recommend setting ISO yourself instead), normal and nature macro, candle, sunset, fireworks, documents, panorama, beach & snow and E-Portrait. E-Portrait mode works much like the ‘Beauty modes’ on Olympus compact cameras, removing blemishes and wrinkles, and smoothening skin automatically.
The minimum focusing distance depends on the lens being used on the camera. As of now, there’s only one dedicated macro Micro Four Thirds lens available – and that’s made by Panasonic: the 45 mm f2.8 Macro. However, you can find dedicated macro lenses from the ‘regular’ Four Thirds side made by Olympus, and perhaps a dedicated Micro Four Thirds macro lens from Olympus themselves in the near future.
Video Recording
The Olympus PEN E-P2 has the same 720p HD movie mode as the E-P1. You can record 720p (1280 x 720) at 30 FPS with stereo sound on the Olympus PEN E-P2. Movies are recorded in M-JPG format with sound recorded at 44.1 kHz. As with other cameras, the E-P2 has a 2 GB per movie clip file size limitation here. You also have the option to lower recording resolution to VGA (640 x 480)
There are a couple of things you can do in the E-P2’s movie mode; such as use the zoom lens, continuous AF mode (though focusing is sluggish and noisy if you use this), adjust aperture and shutter speed values, and record an entire movie using an Art Filter effect (though you cannot change Art Filter effects in the midst of recording and frame rate drops significantly). As with the E-P1 and all cameras that use sensor-shift image stabilization for that fact, you cannot use the PEN E-P2’s sensor-shift image stabilizer while recording movies; though a digital IS alternative is available.
One new feature on the Olympus PEN E-P2 is the ability to attach an external microphone to the camera for better sound quality, via the optional external microphone adapter that attaches to the hotshoe/new accessory port.
Overall movie quality was fairly good. You’ll get movies of better quality than your compact camera (less noise, slightly more detailed) but the E-P2 isn’t really substitute your real camcorder.
Performance
All performance testing of the Olympus PEN E-P2 was performed using a high-speed 8 GB SanDisk Extreme IV SDHC card. A high-speed memory card is definitely recommended if you want to get the most out of the camera in terms of performance.
The Olympus PEN E-P2 has a fairly fast startup time of 1.5 seconds, including the mandatory dust reduction process. If you’ve been using compact cameras all the while, you probably won’t notice but people who have tried and used SLRs before (which allow you to cancel the dust reduction process manually, or disable it completely), you might notice the slight delay here.
In terms of autofocus performance, not much has really changed. The Olympus PEN E-P2 takes roughly 0.3 to 0.8 seconds to focus in decent light, which is slightly faster than its predecessor, but still noticeably slower than a typical SLR (or even Panasonic’s GF1 for that matter). Low-light focusing was quite sub-par - almost like a hit-or-miss thing (mostly a “miss”); which shouldn’t come as a surprise considering the camera’s lack of any built-in autofocus assist methods. Focusing can hunt around for up to two seconds in low-light and even then, it’s not guaranteed that the camera will lock focus.
Two things you can try to improve focusing in low-light is to either get an external flash (which usually have on-board focus illuminators) or try carrying a bright torch with you when shooting in dim conditions.
- Shot-to-shot speed - 1 shot as fast as you can press the shutter button; very fast
- Flash recharge time using a fully charged battery – The PEN E-P2 has no built-in flash
The PEN E-P2 has the same 3 frames per second continuous shooting mode as the E-P1 before it. You can take pictures until the memory card fills up if you’re in JPEG/Fine mode, up to 13 JPEG/SuperFine or capture up to 6 RAW images in a row before the camera starts to slow down.
The Olympus PEN E-P2 performs similarly to the E-P1 (that is, mixed decent performance), which isn’t surprising since both cameras are ALMOST identical. Focusing performance has improved ever so slightly on the PEN E-P2, but I’m afraid that still doesn’t come close to the speeds that digital SLRs and its closest direct competitor, the GF1, have to offer. The reason? Focus speeds are still around “compact camera” level in good light and focusing accuracy in low light is abysmal in low-light. Continuous shooting frame rate could also have been better too - seeing most entry-level digital SLR cameras are starting to hit the 4 FPS mar
Image Quality
Time to take a look at the Olympus E-P2’s image quality:


All test shots, here and in the photo gallery, were taken using the default ‘Natural’ Picture Mode with Noise Reduction off and gradation off.
One area that the Olympus PEN E-P2 does very well is in the image quality department (provided you can actually lock focus first). Image quality at ISO 100 and ISO 200 is essentially noise-free and sharp, with just a tiny bit of additional grain at ISO 400.
At ISO 800, images remain fairly clean, enough to make large prints out of photos. ISO 1600 continues to look good and acceptable for most printing purposes, but will probably benefit from a little noise reduction processing on computer software. At ISO 3200, images start to become limited to mostly small to medium sized prints. I would not advise using ISO 6400 unless you’re willing to post-process photos to reduce noise and downsize them.


As you can hopefully see, not much has really changed since the E-P1 since the two are almost the same camera.
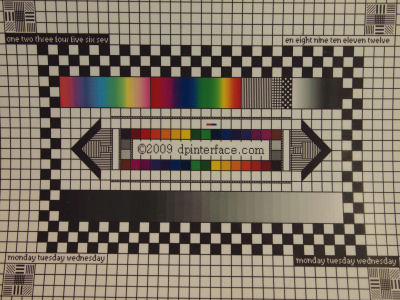
Lens distortion, edge sharpness and color fringing (chromatic aberration) levels depend very much on the lens being used. With the Olympus M-Zuiko Digital 14 - 42 mm retractable kit lens, not even one of the three were issues - which is impressive for a compact kit lens! There was slight distortion and a touch of edge softness in photos, but little to no chromatic aberration (color fringing) to be found.
Since the Olympus E-P2 lacks a built-in flash, I didn’t run any of the usual redeye tests with the camera. If you use an external flash with the camera, the chances of redeye appearing in photos are low (due to the height of the flash from the lens, among other things). In case you DO bump into the rare case of redeye, the Olympus E-P2 has a redeye removal tool in playback mode.
The Olympus PEN E-P2 produces very good image quality that’s almost in the league as digital SLR cameras with slightly larger APS-C sensors. The PEN E-P2 certainly lives up to its name, at least in the image quality area, of offering the image quality of a “larger sensor” camera (versus your typical compact) in a not-so-bulky form factor (ie that of a digital SLR). The kit lens included with the E-P2 is not only compact, it offers surprisingly good image quality for both a small lens and kit lens.
Like the E-P1, dynamic range on the E-P2 was average (on par with similar digital SLR cameras); it has a tendency to blow out highlights but only in very high contrast scenes. Setting gradation to Auto or On will help in brightening dark areas of photos but this is only effective in well lit conditions. In low-light, the difference is unnoticeable.
Photo gallery
Check out full-sized, unedited photos taken straight out of the camera in the Olympus E-P2 photo gallery.
Playback
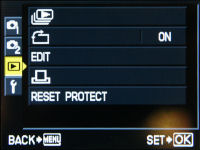
The Olympus PEN E-P2 has the same, complete playback mode found on the camera before it. Photos can be played back with 14X playback zoom available and you can also play movies you’ve recorded with sound.. The usual playback basics are here: print marking, slideshows (with background music and transition effects), voice clip attachment, image protection and auto rotation.
You can playback photos/videos individually, by date in calendar view or your choice of 4 to 100 thumbnails. The camera has a bunch of editing tools for still photos, but none for video, which include Shadow Adjustment (brighten dark parts of your pictures), digital redeye removal, saturation adjustment, image resize, black & white/sepia conversion and aspect ratio cropping. There is also a feature called E-Portrait (beauty mode) to remove skin imperfections and smoothen skin in photos of people.
Two other unique playback tools include RAW processing (RAW edit), that allows you to convert RAW files into JPEG photos directly in the camera, and Multi Exposure which allows you to stack two to four RAW images to be combined into a single JPEG photo. You don’t get a full suite of editing tools in RAW Edit mode as you would get on a computer, but basic settings such as brightness, art filter setting, white balance, etc are present. However, the implementation here on the E-P2 is fairly unintuitive as you first have to select a photo, then pre-set everything in shooting mode such as white balance (which will affect the outcome of the photo) and re-enter playback mode to convert the file.
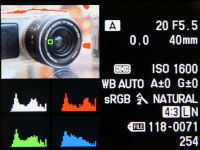
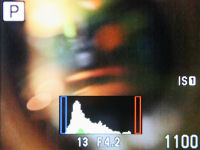
resolution/compression and shutter speed. Press the INFO button and the E-P1 can tell you a whole lot more: from shooting details, mode, full exposure information (with shutter speed and aperture value) and four histograms on screen – Brightness and RGB! There’s also a ‘brightness histogram only’ view (middle screenshot) as well as a highlight/shadow alert feature which “blinks” both underexposed and overexposed areas of your photos to warn you about them.
Conclusion
The Olympus PEN E-P2 is, for most part, an identical twin to the E-P1 - Offering the same retro look (now in black!) combined with solid build quality , 12 megapixel LiveMOS sensor, sensor-shift image stabilization, full manual controls and 720p movie mode. And as I mentioned in the E-P1 review that it has a feature set very close to its E620 digital SLR counterpart (right down till the menus), the E-P2 does too. Several sets of custom functions, color temperature and white balance tweaking, and high degree of customizability – they’re all here on the PEN E-P2.
Olympus has also addressed the issue of ‘no viewfinder’ that people were complaining about on the E-P1 by adding an accessory port on the PEN E-P2. This new port not only allows you to attach an external EVF (and the PEN E-P2 even comes with a high resolution one in the box), but also an optional external microphone adapter if you ever feel the need for better sound quality to go along with your 720p movies. Speaking of movies, you can record 720p HD movies using the PEN E-P2, complete with manual zoom, stereo sound and control over shutter speed/aperture.
Unfortunately, being the close twin of the E-P1 also means that the PEN E-P2 inherits several flaws and shortcomings of the camera, such as the low resolution LCD on the back, lack of real image stabilization when recording video, no built-in flash, lack of an autofocus assist lamp and below average focusing performance. That’s a shame because the camera takes good pictures, even at higher ISO speeds, but has trouble focusing in low-light.
Image quality produced by the Olympus PEN E-P2 was very good with bright, saturated colors (even with default settings) and good high ISO performance till 1600. The 14-42 mm lens of the camera is also what I consider one of the better, if not the best, “kit lens” you can find bundled with a camera – it’s very compact since it can be retracted and also produces fairly good image.
Like the E-P1 before it, the Olympus PEN E-P2 is sort of like a niche-premium camera. It strives at outdoor shooting and picture-taking where there’s good light around, and it even comes with a nice external EVF (though you do pay quite a bit for the camera). It’s not flawless, however, and you probably should do a bit of homework and shopping (consider the other Micro Four Thirds cameras available) before dropping the big bucks on the PEN E-P2.
What’s hot:
- Good image quality with low noise, high levels of sharpness and detail
- Compact, retro body design with good build quality
- External electronic viewfinder EVF included in camera bundle; optional external microphone adapter
- Small, retractable kit lens offers fairly good image quality for a kit lens
- Dual command dials (main dial + scroll wheel) a rarity among digital SLRs of its class
- Full manual controls; RAW image mode, various bracketing modes and white balance tuning
- Intelligent Auto and plenty of scene modes for beginners; fun features like Art Filters and Multiple Exposure
- 720p HD movie mode records at 30 FPS with stereo sound; aperture and shutter speed control
- RAW to JPEG processing and numerous JPEG editing features in playback
What’s not:
- Below average autofocus performance
- Low resolution LCD
- No built-in flash or focus assist light
- No real image stabilization and noisy AF when recording movies; cannot snap a still while filming
- No settings to tweak Art Filters; increased processing times/lower screen frame rate when using them
- RAW to JPEG playback tool is needlessly complex when trying to configure output settings
Recommended Accessories:
- 4 GB or larger high-speed SDHC memory card
“PEN E-P2 inherits the same body design as the E-P1(…) the same metal body”
One more person tricked… METAL BODY?! Actually, it is fully plastic with decorative (non structural) metal external skin. Is it bad? Is it good? I do not know, but metal is… only skin deep.
One strange thing I came across on both EP-1 and EP-2 is a slight change in color when using ISO below 200. From ISO 200 and up the colors are clearly more amber than below ISO 200 (100, 125, 160).
Does anyone have an explanation of this or is it an error in the Olympus firmware?