
Jul 19, 2009
Nikon D5000 Review
Check out my review of the Nikon D5000 digital SLR, the mini-me, less expensive version of Nikon’s D90 SLR, with swivel LCD added to the mix. Visit Nikon D5000 photo gallery as well for full-sized photos taken using the camera. Hit the link for the full review.
This review was written based on a full production, retail unit of the Nikon D5000 using firmware v1.00.
DPInterface Nikon D5000 digital SLR Review
Brad Soo – July 19th, 2009 (Updated July 21st, 2009)
The D5000 is Nikon’s offering in the ‘upper entry-level’ digital SLR category. The camera is priced between Nikon’s own D60 and D90 models, but sits closer to the latter in terms of feature set. Here’s the main buzz that’s going about with the Nikon D5000:
- 12.3 effective megapixels (same image sensor as the D90 apparently)
- Flip-down and swivel 2.7 inch LCD
- Continuous shooting mode that shoots at 4 frames per second
- 720p HD movie mode (1280 x 720 resolution at 24 FPS)
- ISO sensitivity range of 100 - 6400
- Full manual controls; auto and scene modes available too
- Live view with face detection
- Elaborate playback mode with many retouch features
How well does the Nikon D5000 perform? Let’s find out now.
This review was written based on a full-production, retail unit Nikon D5000 with firmware version 1.00.


Size and Weight
(326.8) 145.5 x 107.8 x 73.5 mm (730 g) – Canon EOS 50D
(288.2) 128.8 x 97.5 x 61.9 mm (480 g) – Canon Digital Rebel T1i aka EOS 500D*
(284.0) 126.0 x 94.0 x 64.0 mm (495 g) – Nikon D60
(311.0) 127.0 x 104.0 x 80.0 mm (560 g) – Nikon D5000*
(284.0) 130.0 x 94.0 x 60.0 mm (475 g) – Olympus E620
(226.9) 120.6 x 69.9 x 36.4 mm (335 g) – Olympus E-P1*
(258.8) 124.0 x 89.6 x 45.2 mm (385 g) – Panasonic Lumix G1/GH1*
(281.0) 122.5 x 91.0 x 67.5 mm (525 g) – Pentax K2000 aka K-m
(296.7) 128.0 x 97.0 x 71.7 mm (490 g) – Sony Alpha A380
*Features a movie mode (Video recording with sound)
All the weight figures above show when the camera is empty without any lens, battery or memory card
The Nikon D5000 is one of the larger digital SLR cameras in its class, the main difference being its height and depth (it’s a good 1 to 1.5 cm/half to two thirds of an inch larger in both directions). The D5000 comes closer to ‘mid range’ SLR size rather than entry-level cameras… But that’s not really a bad thing since the D5000 does have better ergonomics, than say, the Canon Rebel T1i.
Inside the camera box
The Nikon D5000 comes packaged with your average digital SLR box contents:
- Nikon D5000 camera body
- EN-EL9a rechargeable lithium-ion battery
- Battery charger
- Viewfinder eyepiece (attached to the camera out-of-the-box)
- Body cap
- Neck strap
- USB and A/V cables
- Camera software CD (Nikon Software Suite disc)
- User’s manual
- Nikkor AF-S 18 – 55 mm f3.5 – f5.6 VR lens (with kit lens option)
You can opt to purchase the Nikon D5000 body only (RRP of $730) or with the 18 – 55 mm kit lens (RRP of $850).
The Nikon D5000 doesn’t include any memory card or internal memory for photo storage, which is the case for all digital SLR cameras out there. It takes SD/SDHC cards so if you’re coming from a compact camera; chances are you won’t need to buy new memory. I’d say 4 GB would be a good size to start with; and if you’re planning to use the camera’s movie mode or RAW image mode, getting bigger/more memory cards would be a good idea. As with most (if not all) digital SLR cameras, the Nikon D5000 is able to perform faster if you use a high speed memory cards with it.
500 shots – Canon Digital Rebel T1i aka 500D
190 shots – Canon Digital Rebel T1i aka 500D (LCD live view)
500 shots – Nikon D60
510 shots – Nikon D5000
210 shots – Nikon D5000 (LCD live view)*
500 shots – Olympus E620
200 shots – Olympus E620 (LCD live view)*
300 shots – Olympus E-P1 (LCD live view)
300 shots – Panasonic Lumix GH1 (LCD live view)
330 shots – Panasonic Lumix G1 (LCD live view)
640 shots – Pentax K2000 aka K-m
500 shots – Sony Alpha A380
230 shots – Sony Alpha A380 (LCD live view)
*In-house testing done by DPInterface. Our tests were conducted as close as possible to CIPA’s procedures
All the cameras above are rated with rechargeable batteries according to CIPA Standard; when using the viewfinder, unless noted otherwise
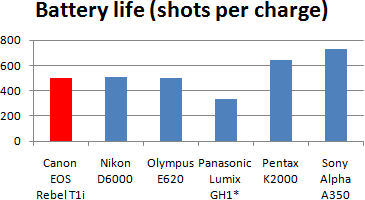
The Nikon D5000 uses the EN-EL9a lithium-ion rechargeable battery and includes a charger in the box. Using the optical viewfinder, the D5000 with its 510 shot per charge rating (CIPA Standard) is on par with other entry-level class digital SLRs of its class – fine, 2% above average if you must insist – with only the Pentax K2000 outdoing the rest by a big 28%. Nikon doesn’t mention how well the D5000 performs using live view so I had to test things out myself. Based on my testing (which was performed alongside the Canon Rebel T1i I had), the D5000’s battery life in live view mode was about average as well.
Here’s a battery life comparison chart I made (you might have already seen it in the Rebel T1i review) which compares the battery life of current entry-level digital SLRs. All of the numbers below are from using the optical viewfinder (except the Panasonic which is a live-view only camera):
Accessories
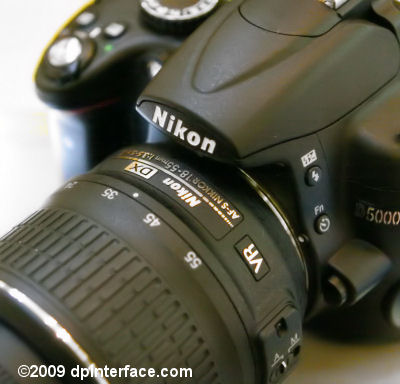
The Nikon D5000 is compatible with a fairly large range of accessories. You can attach just about any Nikon/Nikkor F lenses on the camera. However, since the D5000 lacks the lens ‘screw drive’ mechanism (the D90 has it) of more expensive Nikon cameras, it will only be able to autofocus with AF-S and AI-S type lenses. Some examples of lenses that can autofocus with the D5000 include the Nikon AF-S 18-55 mm f3.5-5.6 VR or AF-S 90 mm f2.8 VR Macro; so be sure to look out for the AF-S/AI-S designation if you want autofocus. Every lens attached to the D5000 will be subjected to its 1.5X crop factor, which makes, say the 18-55 mm kit lens equivalent to 27- 83 mm in 35 mm terms.
Many people new to Nikon’s SLR system have asked me about the importance of Nikon’s ‘screw drive’ on the lens mount. The exclusion of the screw drive mechanism on lower end Nikon SLR cameras are supposed to keep camera size and cost down. They are used almost exclusively for ‘legacy’ lenses (ie. If you’re coming from the era of Nikon film cameras or your parents have a few lenses lying around). The good news is modern Nikon lenses are AF-S and there’s a good selection of them out there, with more being introduced every year. Cutting to the chase; if you’re new to the Nikon system and don’t own any old lenses, you don’t need to lose much or any sleep here.
You can also add on external flash units to the D5000 as well as various flash accessories such as macro lights and brackets. The current Nikon external flash models are the SB-400, SB-600 and SB-900, with the latter able to control (master) additional flash units in a wireless setup. Unlike the Nikon D90, the D5000 does not have built-in support for wireless flashes so you’ll have to get the Speedlight Commander or SB-900 to be able to create and control multiple flashes wirelessly. Third party flash units work with the D5000 as well, but only Nikon models will sync automatically with the camera.
The Nikon D5000 can be controlled from a distance as well since it supports optional wireless and wired remote controls. Other things like camera bags and cases, AC adapter, GPS attachment and HDMI cables are available for the camera as well.
What’s missing here? Battery grip support. This is yet another factor that differentiates the D5000 from the D90. This may be an issue for some as many other entry-level cameras are compatible with their respective dedicated battery grips, and they serve also as a comfortable way of holding the camera in a vertical position.
Similarities and differences versus Nikon D90
Similarities between the Nikon D5000 and Nikon D90:
- 12.3 effective megapixel imaging sensor
- 11 point autofocus
- Shutter life; rated at 100,000 shots
- 720p 24 FPS movie mode
- ISO range (200-3200, expandable to 100-6400)
- Menu system and user interface
- Live view system and implementation
- HDMI output and compatibility with GPS dongle
Differences between the Nikon D5000 and Nikon D90:
- D90 has a fixed, high resolution 3 inch screen (920,000 pixels) while D5000 has a flip-and-twist 2.7 inch screen (230,000 pixels)
- D90 has AF ‘screw drive’ so it can focus with all lenses
- D90 has a slightly higher continuous shooting frame rate (D90 shoots at 4.5 FPS, D5000 shoots at 4.0 FPS)
- D90 is compatible with an optional battery grip; there is no battery grip accessory available for the D5000
- D90 has a larger viewfinder (96% coverage, 0.94X magnification on D90; versus 95% coverage, 0.78X magnification on D5000
- D90 can control a wireless flash setup right out-of-the-box; D5000 requires optional master speedlight or external wireless transmitter
- D90 has color temperature adjustment for white balance
- D5000 has an interval timer shooting feature
Camera Tour
As an entry-level digital SLR the Nikon D5000 is pretty compact, but not as small as many of its competitors. Ergonomics are good in the sense that its grip is large, but at the same time, it has lots of buttons and they’re laid out in a more SLR-like manner; so picking up the camera for the first time can be daunting for beginners. The Nikon D5000’s build quality is very good – the entire camera is made of a mix of plastic and metal, and certainly does feel sturdy in hand.
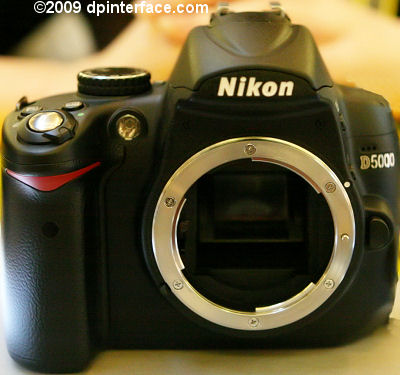
The Nikon D5000 looks a whole like its sibling, the D60, at first glance; just that it’s physically bigger when you put them side-by-side. The camera has a new image sensor, inherited from the D90, which packs 12 megapixels of resolution. The D5000 will take just about any Nikon F-mount lens; but as I mentioned, it can focus with AF-S and AI-S type lenses only and all lenses will be subjected to the 1.5X crop factor (ie the 18 – 55 kit lens becomes equivalent to 27 – 83 mm in 35 mm terms).
The Nikon D5000 has a two-tiered dust reduction system (unfortunately, both approaches only seem to be effective in removing large dust particles while smaller particles still remain) – the common method of ‘shaking’ away dust on the low-pass filter and Nikon’s ‘airflow control’ which uses the movement of air generated by the mirror to lead dust away into a dust chamber below the mirror box. You can also opt to manually clean the sensor.
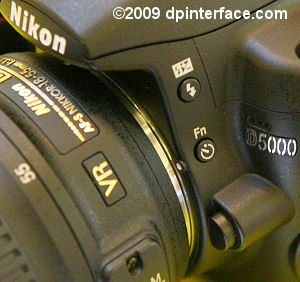
The D5000’s flash is located right above the lens mount, and it has a decent guide number of 12 m at ISO 100. For additional power and flexibility, you can attach an external flash or wireless controller unit to the camera’s hotshoe. Unlike Nikon’s more expensive cameras (ie D90), the D5000 doesn’t have built-in wireless flash control. Nearby is a lamp which does three things – it acts as an autofocus assist light (to help autofocus in low-light), self-timer visual countdown and for redeye reduction. It’s good to see that the D5000 (and other Nikon SLRs) has a built-in focus assist lamp, which is a much more discrete approach than the ‘flash strobe’ based AF-assist used by most manufacturers.
To the right side of the lens mount is a button for releasing the lens as well as the built-in microphone (the three small holes above the ‘D5000’ logo). There’s also an infrared receiver for the optional remote control located on the D5000’s grip.
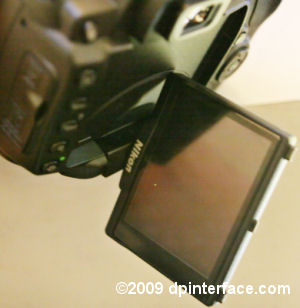
The Nikon D5000 has a 2.7 inch flip down-and-twist LCD screen which increases flexibility for taking photos at weird angles. You can flip the screen down till 180 degrees and turn it until 270 degrees from there, so shots from self-portraits to low and high angle photos are all possible… you can even face the screen inwards to protect the LCD when not in use. Unfortunately, the disadvantage of the screen opening downwards (instead of to the side on things like Olympus’ E620 and Panasonic’s GH1) is that anything below the camera like a tripod or table surface will hinder LCD movement.
The LCD has 230,000 pixels which is decent, but not as amazing as the high resolution screens found on the Canon Rebel T1i or Nikon D90. The LCD is used for displaying camera settings as well as live view (it provides 100% of the actual image). Visibility of the live view image was good in bright light but barely viewable in dim conditions.
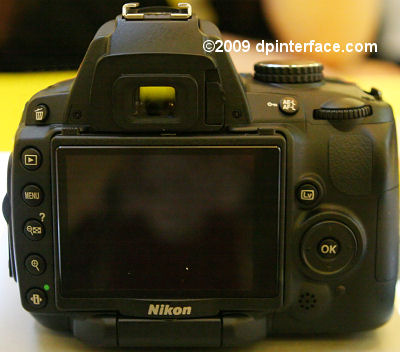
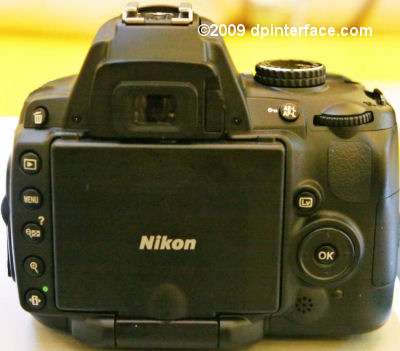
Above the flip-and-twist LCD screen is the D5000’s optical viewfinder. The Nikon D5000’s viewfinder has a decent 95% of coverage and 0.78X magnification. The camera shows a decent amount of info in the viewfinder: exposure (ISO, shutter speed, aperture value), battery level, flash and general shooting details (ie remaining shots, burst buffer remaining). Right next to the viewfinder is the dioptric correction knob, used to focus the viewfinder image.
There are six buttons on the left side of the Nikon D5000. Let’s have a look at them:
- Delete photo
- Playback mode
- MENU
- Zoom out/help menu
- Zoom in
- Change settings – enables you to change settings on the ‘info display’ screen
On the upper right side of the camera, there’s the focus/exposure (AF/AE) lock button, which is customizable, as well as the camera’s rear command dial. Like other entry-level class cameras, the D5000 has only one command dial.
Lower down, there’s a button for toggling the camera’s live view on/off, five way navigation pad and speaker for playing back sound taken with video clips.
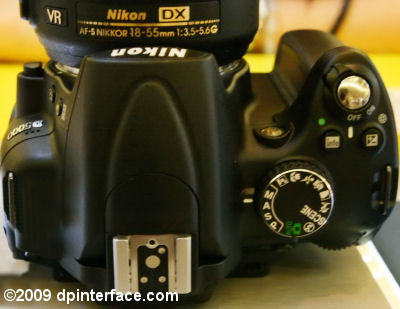
The D5000 has a hotshoe, in-line with the lens, where you can attach any external flash (though only Nikon ones will sync automatically with the camera). The Nikon D5000 can sync as fast as 1/200 sec with an external flash or up to 1/4000 using high speed sync. Unlike some of its competitors and higher end Nikon cameras, you can only control a wireless flash setup using the optional flash transmitter or Nikon SB900 flash as the master unit – the D5000 cannot control an external flash(es) right out of the box.
On the right side, there’s the D5000’s mode dial:
- Automatic shooting
- Program mode – the camera will select both shutter speed and aperture; there’s program shift available so you can tweak the shutter/aperture combinations
- Shutter priority – pick a shutter speed (between 1/4000 to 30 seconds in your choice of 1/3 or 1/2 step increments) and the camera will select a matching aperture value
- Aperture priority – pick an aperture value (depends on lens) and the camera will select a matching shutter speed
- Manual mode – you get full control over both shutter speed and aperture; bulb mode up to 30 minutes is available
- Night portrait scene mode
- Close-up scene mode
- Sports scene mode
- Children scene mode
- Landscape mode
- Portrait mode
- Other scene modes – which include night landscape, party/indoor, beach/snow, dusk/dawn, pets, candlelight, blossom/autumn seasons, food, silhouette, high/low key
- Flash off mode
There’s the shutter button with a power switch around it along with two other buttons towards the camera’s grip. The buttons are for turning on the camera’s LCD info display and adjusting exposure compensation (+/-5 in 1/3 step increments) respectively.
Over here, you’ll find two buttons. First is the button for releasing the built-in flash, choose a flash setting (auto, on, slow sync; redeye reduction option available) as well as adjusting flash exposure compensation (+/-5 EV) – yes, one button that does three things. The second button is the camera’s Function button – by default, it toggles self-timer on/off, but you can assign it to another function if you want.

On the same side of the camera, there are three ports hidden under a rubber flap. The ports (from top to bottom) are: GPS dongle/remote control port, combined USB/audio-video out port and mini HDMI.
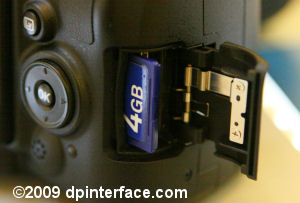
The D5000’s memory card slot is located on the other side of the camera. As I mentioned, the camera takes SD and SDHC cards.
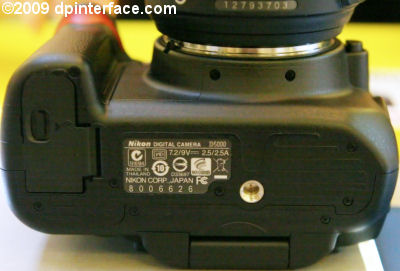
At the bottom of the Nikon D5000 are its metal tripod mount (in-line with the lens) and battery compartment.
Taking pictures (Shooting mode)

Here’s the info display screen of the Nikon D5000; you can change settings directly by pressing the edit settings button (bottom left button on the back). Here are the settings you can change in the column on the right:
- Image resolution and compression
- White balance
- ISO sensitivity (200-3200 base ISO, 100-6400 expanded range)
- Drive mode (Single shot, continuous shooting, self-timer, remote control, quiet shutter)
- Autofocus mode (AF-S single, AF-C continuous, AF-A auto, MF manual focus)
- Focus area (Single point, dynamic, auto, 3D tracking)
- Metering mode (Matrix, center-weighted, spot)
- Active D-Lighting
- Bracketing
The Nikon D5000 has the same 11 point AF as the D90. Out of the 11 points, only the center one is cross-type – compare this to the 9 point AF of the Canon Rebel T1i/500D, with all 9 being cross-type points. Single-point AF uses just the center focusing point, while the dynamic and auto modes do a similar task of selecting any autofocus point(s) out of the eleven available. 3D tracking is self-explanatory – it tracks your subject using the available focus points.
The D5000 also has three bracketing modes – exposure bracketing and white balance bracketing both take three photos: one normal, one darker/cooler and one brighter/warmer photo respectively. Active D-Lighting bracketing takes two shots – one with D-Lighting on, and the other with D-Lighting off.
Live view
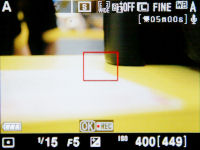
Live view comes in handy for studio and macro shots, and the camera can even be remote controlled (complete with live view feed) via your computer. Unfortunately, remote live view software for the Nikon D5000 doesn’t come bundled with the camera – you’ll have to shell out extra for the optional software. The LCD shows 100% of the frame with shooting and exposure information in live view mode. There are also optional framing gridlines and focus enlargement available but the camera lacks a live histogram.
Contrast detection works with face detection and there’s no screen blackout when focusing compared to phase detection focusing, but autofocus is really sluggish. The D5000 also has an option for ‘subject tracking’. However, it merely tracks, and tracks ONLY, the subject around the frame – the camera doesn’t continuously focus when ‘tracking’.
The Nikon D5000 has a quiet release feature in live view mode. Silent release allows the camera to “hold” its mirror/shutter position and not make any noise until you let go of the shutter button.
Shooting settings
The Nikon D5000 has just three image resolution options: 12 MP, 6 MP and 3 MP. There are two compression settings available (Normal and Basic) for the 6 MP and 3 Mp settings; three settings for 12 MP resolution (Fine, Normal, Basic). Oh, there are RAW and RAW+JPEG image modes as well, again, only for the 12 MP setting. A 4 GB card will hold around 550 Fine/12 MP images or if you’re using Normal compression, 1000 Normal/12 MP photos.
RAW photos are about 10 MB each and a 4 GB card will hold 250 RAW images. If you’re wondering what RAW images are for, they’re useful as you’ll get complete control over almost every single aspect of the image: white balance, noise reduction, contrast, saturation, exposure, colors, etc. If you messed up some camera settings but took the picture in RAW format, then most likely you’ll be able to correct it later on your computer. You can pair RAW shots with JPEG photos in RAW+JPEG mode as well, and you’ll probably want a high-speed memory card here so the camera can write those huge files quicker. RAW shots are fixed at 12 MP though.

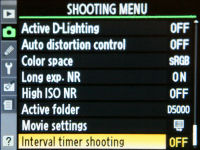
Unlike the simple grid menus on their compact cameras, the menus on Nikon digital SLRs are more comprehensive and are split into eight main tabs (including the custom menu). The first two of which on the Nikon D5000 cover shooting functions:
- Scene mode selection (when you have the mode dial in the ‘SCENE’ position)
- Set/manage Picture Control – more on this in the dedicated section below
- Image resolution and compression
- White balance (Auto, incandescent, fluorescent, sunlight, cloudy, shade, flash, custom)
- ISO sensitivity – you can also set maximum ISO Auto speed and minimum shutter speed
- Active D-Lighting (Off, auto, low, normal, high, extra high)
- Distortion control
- Color space (sRGB, Adobe RGB)
- Long exposure noise reduction
- High ISO noise reduction (Off, low, normal, high)
- Active folder – organize photos in which photos are stored
- Movie settings – select recording resolution and whether sound is recorded with video
- Interval shooting
The D5000 features adjustable white balance, where you can tweak any of the preset settings up to +/-9 steps along the amber-blue and green-magenta axis’s respectively. There isn’t any way you can set white balance by color temperature though.
There’s also an interval shooting option that allows you to setup the D5000 to automatically take up to 999 photos at preset intervals.
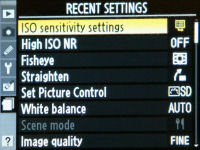
The Nikon D5000 has a customizable menu page, which by default holds a list of recent settings used on the camera. Once you get your hands on the camera, however, you can replace ‘recently used settings’ with your own favorite menu items/settings here for easy accessibility.
Picture Controls
The Nikon D5000 features a bunch of Picture Controls, which are sets of image parameters you can tweak and switch between quickly. There are six preset and nine (!) custom Picture Control parameters, each allowing you to adjust sharpness, contrast, brightness, saturation and hue. If you’re shooting in monochrome, then you can even choose filter and toning effects for photos.
The six preset Picture Control options available:
- Standard
- Portrait
- Landscape
- Neutral
- Vivid
- Monochrome
In addition, you even get to transfer Picture Control options and their respective parameters back and forth from your computer, and from there, transfer them to other Nikon digital SLRs – pretty neat if you have more than one Nikon SLR lying around and want consistent output.
The D5000 has two color space options: sRGB and AdobeRGB.
Setup menu
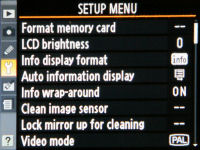
Here’s the setup area of the Rebel T1i’s menu system:
- Format memory card
- LCD brightness
- Info display format (classic/graphical UI) – choose your preferred user interface
- Auto info display
- Info wrap-around
- Clean image sensor – you can activate the camera’s built-in dust reduction as well as define when it activates automatically (off, at startup/shutdown/both)
- Video mode (NTSC/PAL)
- Date and time
- User interface language
- Image rotation – whether the camera automatically rotates images based on the internal orientation sensor
- Sensor dust reference shot
- GPS/Eye-Fi – for the two optional accessories
- Clear settings
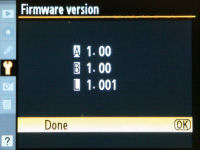
- Firmware version – final firmware v 1.00 here
Custom Settings menu
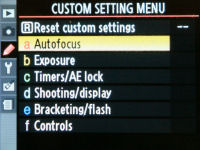
The Nikon D5000 has three pages worth of Custom Settings, split up into six categories which are:
- Autofocus
- Exposure
- Timers/AE lock
- Shooting/display
- Bracketing/flash
- Controls
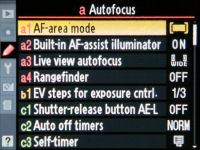
Autofocus
- AF area mode (Single point, dynamic, auto, 3D tracking)
- Built-in autofocus-assist illuminator (On/off lamp)
- Live view autofocus (Face detection, wide area, normal area, subject tracking)
- Rangefinder (On/off) - the camera will show a focus range indicator when manual focusing; only available when using the optical viewfinder
Exposure
- Exposure step increments (1/3 or 1/2 step)
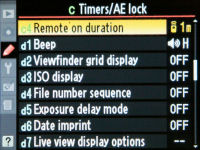
Timers/AE lock
- AE exposure lock when shutter is half-pressed
- Auto power off duration
- Self-timer delay duration and shots taken after countdown
- Remote on duration – period that camera waits for remote control activity before deactivating its infrared receiver
Shooting/delay
- Beep (low/high loudness, off)
- Viewfinder grid display (On/off)
- ISO display in viewfinder (On/off)
- File number sequence (Off, on, reset)
- Exposure delay mode (On/off) – this works like mirror lockup; there is a deliberate delay between pressing the shutter button and when the shutter is actually release
- Date imprint on photos (Off, date only, date and time, counter)
- Live view display options – toggle info display, composition grid and indicators on/off
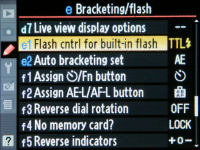
Bracketing/flash
- Build-in flash control (TTL, manual)
- Auto bracketing (Exposure, white balance, Active D-Lighting) – toggle different kinds of bracketing; you can only pick one at a time
Controls
- Function button (Self-timer, release mode, image resolution, ISO, white balance, Active D-Lighting, RAW mode, toggle bracketing) – assign a function to the FN button on the side of the camera; the default function is self-timer
- AE/AF lock button (AE + AF lock, AE lock only, AF lock only, AE lock hold, activate AF-on) – assign a function to the AE/AF lock button on the back of the camera
- Reverse command dial rotation
- Shoot without a memory card (On/off)
- Reverse indicators
Scene modes and macro
I’ve already highlighted the camera’s scene modes when talking about the mode dial in the previous section, so let’s skip on to the D5000 and its macro abilities.
The minimum focusing distance depends on the lens being used on the camera. Nikon makes several dedicated macro lenses – including the famous AF-S 90 mm f2.8 VR macro, which can autofocus with the D5000.
Video Recording
The Nikon D5000 makes an entry into the ever growing list of ‘digital SLRs that can record movies’ with its 720p movie mode. You can record videos at up to 720p resolution with sound. Instead of a ‘movie mode’ spot on the camera’s mode dial, Nikon opted for another approach (a quaint one which may get beginners thinking initially “hey where’s my movie mode?”)… you need to activate live view first, half-press the shutter button to autofocus (don’t press it fully, if not the camera will take a picture instead) and then hit the OK/center button on the navigation pad. That sounds comparatively complex versus the Canon Rebel T1i’s “switch to movie mode, press a button and start recording”, in my opinion, but I suppose you’ll get used to it.
Movie resolution/frame rate options available are:
- 720p high definition (1280 x 720) at 24 FPS
- 3:2 “almost” VGA (640 x 424) at 24 FPS
- 3:2 “almost” QVGA (320 x 216) at 24 FPS
Unfortunately, there are a couple of limitations here and there. First off, there’s a 5 minute per clip limit for 720p videos (20 minutes with the two lower resolutions). The other thing is sound, which comes with a bunch of limitations – the camera records mono sound using its built-in speaker, at a low 11 kHz and you cannot attach an external microphone to the D5000.
You can operate the zoom lens while recording movies but you cannot autofocus or use continuous AF. And it is rather inconvenient trying to turn the lens zoom ring while trying to steady the camera at the same time. Movies are recorded in AVI MJPEG format.
Video quality was good while audio quality was so-so. Besides the ability to record videos in low-light better than a compact camera (At the cost of some visible noise), there’s nothing mind-blowing here. What does that say about the Nikon D5000? Well, it certainly won’t be COMPLETELY replacing your dedicated video camera anytime soon (in fact, this statement applies to all current digital SLRs with movie modes as well). For the occasional clip where you forgot/didn’t want to carry your video camera along, the Nikon D5000’s movie mode surely comes in handy.
Performance
All performance testing of the Nikon D5000 was performed using a high-speed 8 GB SanDisk Extreme IV SDHC card. A high-speed memory card is recommended if you want to get the most out of the camera in terms of performance.
The Nikon D5000 starts up in 2 seconds, after completing the dust reduction process. If you’re in a rush, you can half-press the shutter button to cancel it, or disable the process at startup completely (via the Custom Settings menu). With dust reduction disabled, the camera is able to startup close to instantly.
Focusing times depend on the lens being used, but the D5000 shares the same, nice AF system as the D90, resulting in snappy focusing most of the time with any lens. Using the Nikon AF-S 18-55 mm f3.5 – f5.6 VR kit lens, focusing can vary between 0.1 to 0.3 seconds with at least decent lighting while focusing can stretch to 0.6 to 1 second in low-light. Focusing in low-light is no problem as the built-in AF illuminator lamp comes on to help the camera lock focus.
While ‘normal’ focusing was great, live view AF was the complete opposite – sluggish and especially poor in low-light.
- Shot-to-shot speed - 1 shot as fast as you can press the shutter button; very fast
- Flash recharge time using a fully charged battery - 3 seconds on average (built-in flash)
The Nikon D5000 has a continuous shooting mode which shoots at 4 frames per second. For comparison’s sake, the pricier D90 shoots at 4.5 FPS, though I don’t consider it to be a world of difference between the two. The camera seems to be hardcoded to take only 100 JPEG shots in a single burst though, writing photos as they are taken… as soon as you hit the 100 shot limit, you can let go of the shutter button briefly, then mash it down again for another 100 shots without delay. In RAW mode, the camera can shoot at the same rate for up to 10 RAW or 5 RAW+JPEG shots.
The Nikon D5000 is a very responsive camera and performs well; it falls nothing short of being a nice picture taking tool. I like how Nikon didn’t choose to ‘cripple’ their lower end bodies (unlike a Certain camera manufacturer) and included the D90’s autofocus system here, as well as a good burst rate of four frames per second (that’s about the fastest you can get at the moment on an entry-level digital SLR, besides the competing Olympus E620)
Image Quality
Right, let’s have a look now at the Nikon D5000’s image quality:


The Nikon D5000 has a base ISO range of 200-3200, which can be extended to ISO 100-6400. The first three crops, ISO 100 through 400, are generally smooth and noise-free. Some visible noise appears in the ISO 800 crop, looking a bit grainy but image quality remains very good and usable. Go up to ISO 1600 and image quality is still not bad – you could make a mid-sized print out of this one or put photos as your desktop wallpaper without the noise being too much of an intrusion.
ISO 1600 would be the most you would want to go in low-light, while with decent lighting, you could still push things up to ISO 3200; though depending on conditions, you will have to be prepared to do some post-processing (noise reduction) on your computer. At ISO 6400, things get very noisy and images begin to lose saturation – for people good in RAW image processing MAY be able to savage photos here, but for the average SLR user or beginner, I’d just stay away from this setting if I were you.
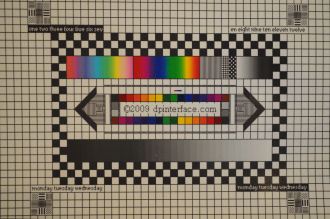
Lens characteristics such as chromatic aberration (color fringing), distortion and vignetting/edge sharpness will obviously depend entirely on what lens you’re using with the camera. With the bundled 18-55 mm VR lens (if you choose to go with the kit lens option), there was very little to no chromatic aberration (color fringing) to be seen as well as minimal distortion. However, edge softness is an issue and so is overall sharpness – you see, you shouldn’t have sky-high expectations for a lens that costs under $150. The kit lens should serve fairly well as a starter lens, though you may want to consider stepping up to other more versatile/better quality lenses in the future.
By default, the Nikon D5000 produces images unlike typical entry-level digital SLRs (which tend to increase default color vibrancy and sharpness a little to ease the transition for those coming from compact cameras). Photos straight out of the D5000 look natural, perhaps a tad soft looking and dull to some. That can be easily solved by cranking up contrast/saturation/sharpness in the camera’s Picture Control settings menu.
Redeye was not a problem with the Nikon D5000, even if you use the built-in flash. In case you ever come across any redeye, you can always use the redeye removal playback tool. Dynamic range levels were average for a digital SLR of this class: good shadow detail, occasional clipped highlights in contrasty scenes (ie landscapes with bright backgrounds/overcasts). The D5000’s Active D-Lighting can help pull up shadow detail and improve contrast, but however, it also slows down shot-to-shot speeds noticeably.
Image quality produced by the Nikon D5000 falls nothing short of very good. Noise levels were low and detail levels can be impressive if you’re using a good lens (for example, an AF-S 105 mm macro lens I used with the camera) with the camera. The bundled kit lens, however, is NOT a fantastic lens – it’s a decent lens to begin with but you’re likely to outgrow it (or at least after you’ve tried better lenses on the camera). Color accuracy was good and photos looked natural.
Photo gallery
Head on to the Nikon D5000 photo gallery for full-sized sample photos taken straight out-of-the-camera.
Playback
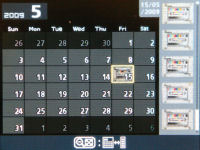
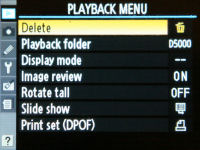
The Nikon D5000 has an elaborate playback mode with even a dedicated retouch section in the camera menu. You can play back photos with magnification available (up to almost full size I believe) to confirm focus and details. The usual playback basics such as print marking, slideshows and image rotation are here. Photos can by viewed one at a time, by date in calendar view or in sets of thumbnails (various sizes).
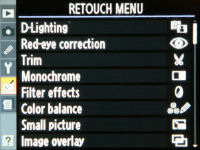
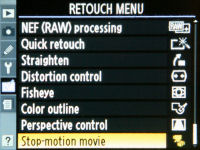
There’s just so much stuff in the D5000’s retouch menu, I’ll put them in a list here:
- D-Lighting (low, medium, high)
- Redeye correction (software based)
- Image trimming aka cropping
- Monochrome conversion
- Filter effects (R/G/B, softness, warm, skylight)
- Color balance correction
- Small picture – resizes photo for web display
- Image overlay – overlay (combine) two photos; only can be used with RAW shots
- NEF (RAW) processing
- Quick retouch
- Straighten photo
- Distortion control – reduces barrel distortion
- Fisheye effect
- Color outline
- Perspective control
- Stop-motion movie – create a silent VGA motion clip using a combination of up to 100 several pictures (great when paired with the interval shooting feature)
There’s D-Lighting in playback mode, but what’s the difference between D-Lighting and Active D-Lighting? Active D-Lighting brightens photos as they are taken, and is able to improve image contrast slightly but increases processing times by quite a margin (ie, you can’t use burst mode at full speed). D-Lighting allows you to take normal photos without compromise in shooting performance and brighten photos later in playback, but it isn’t as effective as Active D-Lighting (though I don’t think it’ll make a huge difference).
One feature that I absolutely love on the D5000 is the NEF (RAW) processing feature. It allows you to process RAW images and convert them into JPEG photos right in the camera. However, you won’t get a whole comprehensive suite of controls as you would in a computer – you can only define image resolution, compression, basic brightness (using an exposure compensation scale), white balance and Picture Control. So, while it’s not a complete replacement for RAW processing on your computer, the RAW conversion feature is useful if you suddenly change your mind about a photo shot in RAW and think ‘JPEG is good enough’ for it (or if you find yourself in need for additional memory space).
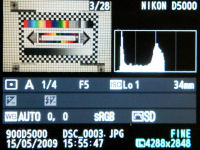
The Nikon D5000 is able to show you a ton of information about your photos in playback. You can check out shooting details, mode, full exposure information (with shutter speed and aperture value), a brightness histogram (an option for RGB histograms with their respective color channels is available) and even the lens used and focal length! The camera can even make overexposed areas (highlights) of your photos blink and show you the Picture Control setting used along with details.
Conclusion
As I mentioned, the Nikon D5000 is the in-between model, seated above the D60 and below the D90 in Nikon’s digital SLR lineup. The D5000 features 12 megapixels of resolution on its 1.5X crop DX sensor (apparently the same thing you’ll find on the more expensive D90), a 2.7 inch swivelling LCD with live view, 4 FPS burst mode and the full expandability and controls you’d expect from a digital SLR.
At first sight, the Nikon D5000 may seem rather daunting with its spread out buttons which have a more SLR-esque layout; there’s even a customizable function button. But try it out and you’ll find things to be more intuitive than they seem. The camera’s build quality and handling are both good as well.
The D5000 has a flip-down and twist screen, which comes in handy when using live view. Unfortunately, the bottom hinge design hinders the swivel function when you have the camera on a tripod. Live view performance itself was so-so and only useful when shooting still life; you’re limited to contrast-detection focus which worked rather sluggishly. Remote control software is optional, so you’ll have to pay extra for the privilege of remote live view from your computer.
The Nikon D5000 has plenty of scene modes and beginner friendly help screens as well as full manual controls and a nice array of Custom Settings. However, the D5000 lacks the built-in wireless flash control and screw-drive mechanism for autofocus with legacy lenses; two features that distinguish the D90 from its cheaper sibling here.
The only area where the D5000 didn’t impress much was in the movie department. Sure 720p at 24 FPS sounds nice but seems the movie mode here was added just for the sake of touting it as a feature. 720p movie clips are limited to 5 minutes each and autofocus is completely unavailable once you start recording. Video quality was good but let me remind you, not mindblowing, while audio quality was merely so-so. The camera records mono sound and you cannot attach an external microphone.
Performance in terms of speed and image quality was pretty good. The D5000 was quick in terms of shot-to-shot speed, and the 4 FPS burst mode performed just as advertised. My usual wants here are faster autofocus in live view and the ability to take more RAW photos in a single burst. Photo quality was good with low noise and plenty of resolution – it should be no problem using photos up to ISO 1600 or 3200 (depending on whether you’re willing to do post-processing). If you’re coming from a compact camera, you may find pictures a bit dull looking (because SLR cameras try to preserve the picture’s ‘natural’ look don’t usually try to fluff up photos)… if you find that an issue, then you may want to consider turning up contrast and saturation in the camera’s menu.
The Nikon D5000 is indeed a very capable digital SLR, a joy to use. To summarize, the D5000 essentially take most of the good stuff (autofocus system, image sensor and consequently, good image quality characteristics) from the D90 minus a few features like the in-body AF motor and puts them into a form-factor of a more familiar, less intimidating body of an entry-level digital SLR. For newbies looking to buy their first digital SLR and avid, existing SLR users alike, the Nikon D5000 is a good camera that deserves my recommendation.
If you’re torn between the D5000 and D90, I would suggest checking out the section at the beginning of this review that highlights the differences and similarities between the two. And from there, decide if you wanna pay another $100+ to step up to the D90, or if that money is better spent on your ‘new lens piggybank’ instead.
What’s hot:
- Very good image quality; low noise as you’d expect from a digital SLR
- Flip-and-twist 2.7 inch LCD
- Layout and design resembles a ‘real’ digital SLR more than a compact camera
- Slightly larger size and grip; and better ergonomics than typical entry-level SLRs
- Plenty of scene modes and useful help tooltips for beginners
- Full manual controls; flash hotshoe, RAW image mode
- Customizable menu area and Function button
- Fast performance; very good burst mode
- 720p HD movie mode that records at 24 FPS is good for the occasional video
- Plenty of playback ‘retouch’ tools
What’s not:
- Hints of picture softness here and there; kit lens isn’t the best option if you want the most image quality out of the camera
- No built-in wireless flash control; battery grip accessory unavailable
- Autofocus possible with AF-S/AI-S lenses only; lacks support for AF with legacy lenses
- Movie mode is underwhelming; limited to 5 minutes per clip, mono sound, no option for external microphone, no continuous autofocus
- Limited RAW buffer in burst mode
- Sluggish autofocus in live view mode, live view lacks live histogram; remote live view software not bundled and costs extra
- ”Low pass filter shake” and airflow methods not effective in removing smaller dust particles
Recommended Accessories:
- 4 GB or larger high-speed SDHC memory card
Related articles:
- Nikon unveils D300s and D3000 digital SLRs
- Nikon D3X digital SLR
- Nikon D5000 announced
- Nikon Coolpix S710 Review
- Nikon Coolpix S60 Review


[...] D3000, on the other hand, is an entry-level digital SLR, positioned below the D5000 we reviewed recently. The D3000 is like the old D40X updated for 2009 with a few new features and lower introduction [...]